
I’m back today with one of the biggest transformations our house has ever gone through. Our existing carpets were a nasty tan that had seen better days. We replaced our floors upstairs with beautiful new hardwoods, and that made these stairs look even worse. It was time to renovate our carpeted stairs. It ended up being a little more difficult than normal since we planned on installing hardwood flooring on stairs with an existing nosing, but I found an easy solution. Here’s our starting point:

I’ve always loved the look of dark wood treads with crisp white risers like this and this. We had actually planned to replace the carpet on the stairs while we were doing our big flooring install upstairs, but we got sidetracked. Here’s what we had been living with since we paused our renovation:

Demolition
I basically laid the flooring all the way up to the top step so we could come back later and finish it. We ripped up the carpet on the stairs by first cutting a strip away from the top and basically just pulling really hard. You’ll need gloves for this since there’s tack strip, but it’s a pretty easy job otherwise. Easy, but gross. 20 years of dirt is just nasty, no matter how well you clean your home.

After the top layer of the carpet was gone, it was time to work on getting all the staples and nails out. I found a tool that gave me a strong grip and pulled, a pry bar works well, and so do needle nose pliers. Lather, rinse, repeat 10,000 times. It was time-consuming, but I threw on a podcast and zoned out. A few hours later, we were ready for the next step!
Fixing The Risers
After I got the staples out and the tack strip up, it was time to tackle the risers. A lot of homes with carpeted stairs (especially if they were built toward the second half of the 20th century) have some pretty shoddy workmanship beneath the carpet. Our risers (and treads) had some pretty big gaps on either

I decided that instead of sanding everything down, I would just install new risers that I cut down from longer boards. It worked incredibly well, and I’m very happy with the result. If you choose to do it this way, don’t assume that each step is the same height. T
Placing The First Boards
Finally! It was time to put the first step on. I hooked the new tread piece to the existing floor upstairs and glued it down using Liquid Nails. Most contractors recommended

Anyway, I glued it down and placed in the new riser with construction adhesive as well. Then, I cut and placed the cove trim. I also taped everything together to make sure it would stay in place while it dried. I also shot a finishing nail through the trim for good measure.
Dealing With The Stair Nosing
While that dried, it was time to solve another challenge. I had the same issue that Kelly over at Lilypad Cottage was dealing with during her stair renovation. Each one of our stair steps had a lip or edge on it (nosing), and the replacement hardwood flooring we planned to install didn’t cover it.
You can kind of see what I’m talking about in the picture above. I also used cove trim underneath each step to cover things up. I don’t have the patience to trim off each and every step like she did. Serious respect. I definitely admire her for doing it! I think if I hadn’t been trying to do this with a sleeping baby in the house, I would have cut each step off. But without an industrial strength noise machine, I had to find a quieter way.

My solution for installing hardwood flooring on stairs with an existing nosing? Paint. The overhang from the new flooring + the cove trim almost covers the entire lip of each step. Maybe a 1/8″ is left showing? Not enough that it’s worth it (to me) to cut the whole thing off. It would have been a dirty, time consuming, and difficult process. So, I bought a $2 test pot of paint that matches the color of the new flooring and painted the edge of each lip. You can’t see it from a regular walking angle, and most of it is going to be covered in a stair runner anyway.

I worked my way down the stairs, gluing, nailing, and taping things into place. One word of caution, though – go with a shorter nail if you’re working with hard materials. I originally used a longer nail, thinking it would add more stability, but it just bent. The shorter nails went right in, and I had no issues.
Painting The Risers

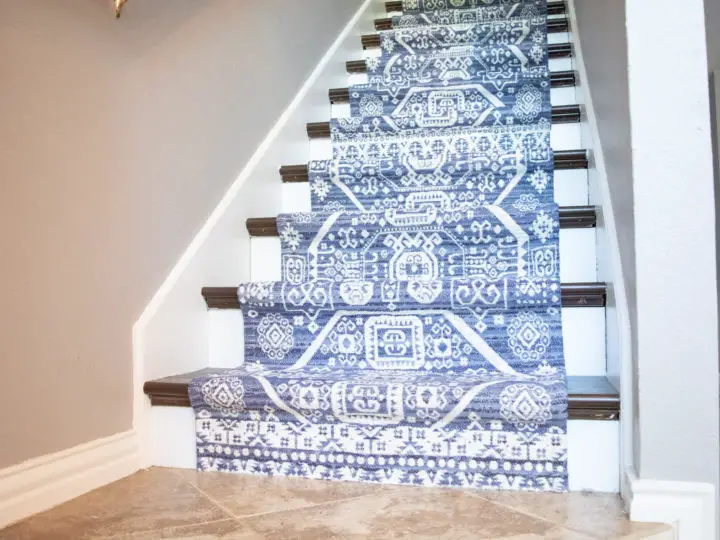
Finally! All the treads were installed, the risers were painted, and all the trim pieces were in! We actually lived with it like this for a few months. I loved how clean it looked and didn’t want to cover up all my hard work! But, Tabby (our pup) was afraid of the new slick stairs and was sliding around like crazy. We had a baby very interested in them as well, and I wanted to give her something more stable to walk on. So, we installed a runner!
Installing The Runner
We have an awful lot of grey in our house. I chose to paint ALL the walls in our great room, entryway, stairwell, office, and upstairs hallway the same color when we moved in. It was a safe option, and I stand by it, but we definitely could use a little more color around here. I ended up picking this runner from

Installing it was a breeze – it took me about two hours. I actually found it helpful that I had three separate runners to install. It was less fabric hanging down where I didn’t need it. I followed this process:
- Start the runner by securing it with a few staples at the top of each riser, making sure it’s centered.
- Wrap the fabric around the lip of each tread and pull taut. Be careful not to pull hard on one side and making sure everything stays straight.
- Shoot in one or two staples on the ends of the fabric, and double check everything is centered.
- Repeat until you run out of the runner. Then, cut the thicker fabric binding at the end of your original runner and the new runner and smush them together where a riser meets a tread.
- Continue steps 1-4 until the last step, then cut clean across the bottom and staple into place.

Finishing The Runner
A lot of tutorials out there said to wrap the bottom of the runner underneath itself so you have a nice, tidy edge. Our runner was so thick, though, that it would have looked incredibly bulky and cumbersome compared to how tight it was on the rest of the steps.

The carpet is soft underfoot, and it feels so much safer. We haven’t had any issues with stains or dirt in the year+ we’ve had it installed (even with an 80-pound dog and two kids). With such a busy pattern, I expect to be able to hide any stains that show up. The flat weave has stood up well to Tabby’s claws, and we’ve had zero issues with fraying, scratchiness, etc. I just sweep it off every so often, and it looks brand new!

Above is a picture of how the two rugs meet. I didn’t have the normal setup that a lot of people do with a ‘real’ stair runner. Normally, you would wrap the fabric underneath the stair tread (where it isn’t visible). With the shallowness of the lip of each tread on our stairs, that wasn’t possible.
Have you ever dreamed of ripping that nasty old carpet off your stairs? Anybody else out there that hates pulling staples out? This was definitely a more involved hardwood flooring install than I realized at first due to the existing nosing on the stairs. I’m so glad it’s done, and now we can finally enjoy it!
Thinking of ripping out a wall around your staircase, so you can show off your new carpet-less stairs? Read my post about determining which staircase walls are load-bearing first!