
Today’s post is a story about a project that just grew and grew and grew (much like my love for chocolate) until I threw the original timeline out completely and gave myself over to the renovation gods. Removing carpet from a concrete slab sounds easy, but there’s a little more work involved than if you have a traditional wooden subfloor.
If you are lucky enough to live in a place with a basement, color me jealous. We live in Texas, which is prone to flooding so all the houses here are built on concrete slabs. Now, I grew up in Kentucky where basements are much more common, so adjusting to that new reality took some time. But things really came to a head when we decided to rip out the carpets in our master bedroom – as you can see, they

Kidding, obviously. Can you say gross? There are stains ALL OVER the place. I don’t know how we lived with them as long as we did if I’m being honest. The previous owners had them cleaned before we moved in, but if you’ve ever owned a home with carpets, you know stains creep back quickly.

So removing carpet from our concrete slab started like any other renovation – rip those puppies out. Demolition is something you can totally DIY and it’s just SO FUN. There’s something so satisfying about removing carpet, and if it wasn’t so disgusting I’d even say I enjoyed it! If you’ve never removed carpet before, it’s pretty easy.
- Cut your carpet into manageable strips, between 12″-24″ wide.
- Roll your strip up onto itself until it’s almost too big to manage, then cut to remove it from the surrounding carpet (just the carpet, don’t try to get the underlayment too).
- Repeat until all the carpet is removed, and pause to celebrate!
- Repeat the process with the underlayment (that red stuff you see in the picture below).
- Use a pry bar to peel up the tack strips (those sharp ruler looking things surrounding the whole room) and dispose of them.
- Scrape any remaining glue from the floor and sweep! You’re now carpet-less!
Here’s where things take a turn from the expected (aka carpet installed over wood subfloors): removing carpet from a concrete slab involves also removing the approximately 10 million nails driven straight into the concrete around the perimeter of the room. It will seem like getting those out is impossible, and I definitely felt that way too for a little while. But the good news is, I’m gonna save you some headaches and just tell you the easiest way to deal with those. We tried a lot of different things and through trial and error (mostly error), found the best solution.
Get yourself a Dremel like this one from Amazon, or this one from Home Depot. While you’re at it, pick up a carbide blade, either from Amazon or Home Depot, as well. You’re going to cut every single one of those lovely little nails so they are flush with the concrete. Don’t try and pry them out (it’s gonna want to take concrete with it) or hammer them in (same thing). It’s loud. It takes five-ever. You just have to do it. Just make sure you wear your safety goggles because cutting metal = sparks.
The neat thing about this is that during this project, I couldn’t stop thinking about my Dad. The sound of my childhood was a Dremel tool – he makes all kinds of models, car parts, basically anything you can think of. And one of his favorite tools is a Dremel. Every time Aaron fired that thing up (because my son was cluster feeding during this renovation, Aaron did most of the cutting) I thought about Dad. It’s funny how sounds can bring you right back to a previous time in your life!

As always, the right tool makes the job much easier. The best tools we’ve found for projects involving carpet and trim (we’ve done close to 1,500 square feet at this point!) are:
- A hooked knife to cut the carpet up in the first place. (Amazon, Home Depot)
- A scraper to remove excess glue. We have concrete subfloors in this room, but it worked well on the plywood subfloors upstairs, too. (Amazon, Home Depot)
- A pry bar to remove the trim – ours splintered into a thousand pieces when we removed it, but with more substantial trim you can definitely put it back on. (Amazon, Home Depot)
- A multitool to help cut the trim where you need to give clearance for the new floors. (Amazon, Home Depot)
Congrats! You now have a completely bare concrete subfloor ready for the new flooring of your choice. We chose to install bamboo hardwoods (just like on our stairs and on the second story) over it, but you could do any number of things – tile, cork, laminate, etc. The world is your oyster at this point!
One quick note though – you know how I always say to double the amount of time you expect a project to take? Yeah…double would have been a light estimate for this one. I expected we could get all the floors laid in a weekend, but it took almost an entire week to complete everything. A lot of that had to do with renovating with little ones running around, but the millions of nails to be removed didn’t help. If you are considering removing carpet from a concrete slab, definitely budget more time than you think you need to finish up cutting out all those nails.

Back to the renovation – since we were so far ahead of schedule (haha!) I decided to repaint, too. The bedroom was one of the first rooms we painted when we moved in, and I loved the blue, but times change. We went with a very light tan, which looks suspiciously like what it was before we painted it blue. You live and you learn, though, right?

And because one thing always leads to another (no, just me?), I also decided it was time to upgrade our headboard/bed frame. We were definitely on a budget at this point, though, so I threw this absolute MOOSE of a headboard together with some curtains and a mattress pad from Home Goods, and a big 4×8 MDF panel we already had in the garage. It’s seriously huge, guys. I think someday I’d like to add some nail trim to make it look a little fancier, or maybe beef up the padding, but for now, I’m thrilled with how it turned out. I just hung it on the wall with a french cleat (they’re the best way to hang really heavy things, you can find them here, at Home Depot, or at any local hardware store) and called it a day.
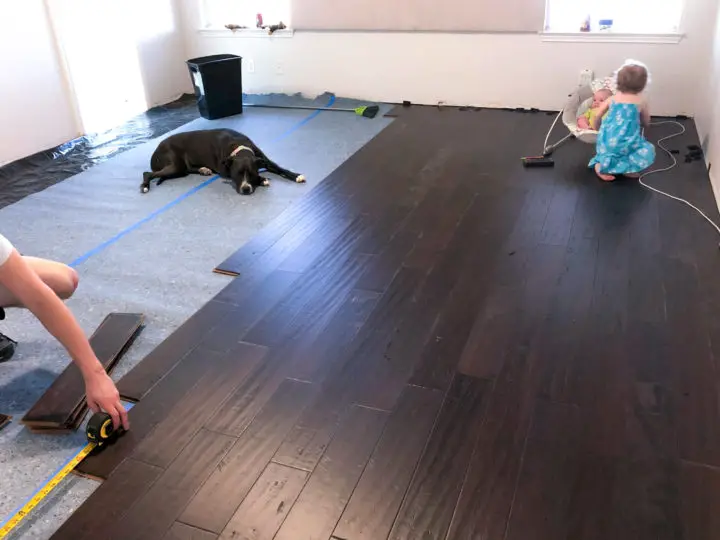
We finally had our floors clean and nail-less, so it was time to prep for the hardwoods. First, we put down a moisture barrier, which is basically like an extra thick trash bag that keeps moisture from the porous concrete foundation away from your moisture-hating hardwoods. (Totally not necessary if you have a plywood subfloor, but for a concrete slab like ours, you have to use one). You can see that in the left of the image below. Then, we laid down our underlayment. I wasn’t super happy with the Insulayment that we used upstairs, but for the sake of consistency, we used it in our master too. It’s what the guy at Lumber Liquidators sold us, and while it has worked just fine, I would definitely choose something different in our next home.

The Jefferson County hardwoods from Lumber Liquidators have since been discontinued, but you can find some similar flooring at your local hardware or flooring retail store.

We finished laying all the hardwoods, installed the baseboards (with the help of a great local handyman…crawling on my hands and knees right after having a baby was NOT on my to-do list), finished painting, and voila! Brand new room. I love how they turned out, and I don’t have to worry about what awful thought-to-be-extinct disease my kids are getting from touching the gross old carpet. It feels great under our feet, and it’s SO much easier to take care of.
So if you want to remove carpet from a concrete slab, budget a lot of extra time, and invest in a Dremel. I’m so glad we did. It would have been much easier to just put in new carpet, but with two kids and a dog, hardwoods made much more sense.
If you’re in the market for a rotary tool and aren’t sold on a Dremel after reading this blog, check out my latest post comparing common rotary tools.
Have you guys tackled any projects that you thought would be relatively quick, but run into something that ended up taking a lot longer? Or do you love
PS: Want more of the inside scoop? Follow me over on Instagram for more of the day-to-day stuff. Big posts like this are fun, but the minutia of daily tasks is what keeps me following my favorite bloggers. Hope to see you there! You can even check me out over on Pinterest, where I share all kinds of DIY and Home Improvement stuff!
Jim Klauser
Friday 28th of May 2021
Is there anything to remove the adhesive besides elbow grease?
Catherine
Friday 28th of May 2021
Unfortunately, no. I didn't find anything other than just raw power helpful - I wish I had better news for you!
Carpet Installer
Thursday 28th of January 2021
Good Job! And I really enjoyed reading your blog. You have a great style. Next one, you can write about removing old carpeting and installing new! Since I do carpet installations! LOL
Catherine
Saturday 3rd of April 2021
Thank you so much! Someday when we don't have kids or pets anymore, absolutely! I love the feeling of carpet under the feet, I just can't keep up with the stains 😂
Denise @ HelpingHunny.ca
Thursday 21st of March 2019
Looks fantastic! I love how the whole family is "helping" :)
Catherine
Friday 22nd of March 2019
Thank you! We have the best little helpers around here :)